Beef Stroganoff with Creme Fraiche

•May 16, 2016 • Leave a Comment

IMG_3187

Up until about 9 years ago, my exposure to Russian culture pretty much began and ended with those cute little matryoshka dolls, you know the ones that endlessly stack inside one another? To be fair, these are amazingly cute and even come in ninja form! But I digress. At any rate, until I met my future husband, Alex, I pretty much knew jack sprat about any Russian cooking at all.

With winter in full swing, I found myself yearning for stick to your ribs type comfort foods. Maybe it’s the inner primitive instinct to eat heartier foods to better prepare for the winter hibernation, OR it’s just my inability to turn down a good, hot steaming bowl of delicious at any time, winter being no exception!

I had earmarked this recipe ages ago and finally got around to giving it a go, but was remiss in posting it for you guys.  What initially drew me to this recipe was the twist of creme fraiche over the traditional addition of sour cream.  For those of you who’ve never used creme fraiche before, I’m here to tell you that it’s amazing.  Gently tangy, creamy and rich, it’s the more sophisticated, adult version of sour cream.  Couple that with a few generous splashes of cognac and you, my friend, will be exported to the richest, most luxurious bowl of stroganoff ever!

Adapted from Bon Appetite
September 1999

Ingredients

2 1/2lb beef tenderloin, well trimmed, meat cut into 2 x 1 x 1/2 inch strips
2 tablespoons vegetable oil
6 tablespoons (3/4 stick) butter; divided 4tblsp and 2 tblsp
1/2 cup finely chopped shallots
1 pound small button mushrooms, thickly sliced
1 cup canned beef broth
1/4 cup Cognac
3/4 cup crème fraîche
1 tablespoon Dijon mustard
1 tablespoon chopped fresh dill
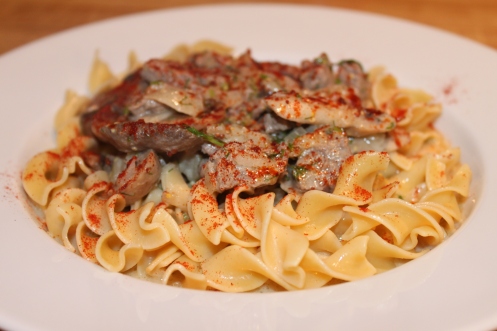
12 ounces wide egg noodles
1 tablespoon paprika

Preparation

Pat meat dry with paper towels and season generously with salt and pepper.  Heat oil in large skillet or dutch oven until shimmering.  Add in meat and cook until just brown, about 1-2 minutes.  Remove meat and drippings to a separate bowl.

Turn heat up to medium high and melt 4 tablespoons of butter in skillet.  Add shallots and saute until tender and translucent, scraping bottom of pan frequently to remove frond.  Add in mushrooms and continue to saute until most of liquid has evaporated.  Add in beef broth and cognac and simmer until liquid thickens and coats mushrooms, about 15 minutes.

While the stroganoff is thickening and reducing, bring separate large pot of salted water to bowl and cook noodles according to package directions.  Drain and toss with remaining 2 tablespoons of butter.  Season with salt and pepper.

Once stroganoff has thickened, stir in creme fraiche and Dijon mustard until combined.  Add in meat and any drippings to skillet and simmer over medium low heat until meat is just heated through and meat is still medium rare and tender, about 2 minutes.  Stir in dill and season with salt and pepper to taste.

To serve, divide noodles among serving plates, top with beef and generous amount of sauce and sprinkle with generous amounts of paprika.  Buckle up and get ready to be transported to hearty comfort food heaven!


Zuccotto

•December 26, 2013 • Leave a Comment

And I’m back! I know it’s been an unforgivable amount of time since my last post, but for those of you who know me personally, you’ll know that it’s been a crazy busy year and a half! Last June, I pulled off my biggest crafty girl feat yet, my own crafty wedding! Pictures can be found here on our amazing photographer Amanda’s blog:

http://swoonovertheblog.com/2013/02/19/liz-alexs-wedding-at-walnut-hill-college-philadelphia-wedding-photography/

Then, this past March, we were blessed with the birth of our son, Hunter, who has been quite the amazing handful! Needless to say, between juggling diapers, carseats, baby food, and work, my schedule has been totally crazy! On the good side, I’ve still been cooking and I have a bunch of recipes to post! On the bad side, boy do I have a lot of recipes to post!! I figure what better way to ring in the new year of 2014 than to get back to sharing with you guys my wonderful foodie adventures? 2014 New Year’s resolutions — blog more, check! Lose 20lbs, we’re going for it, check! Clean and organize my house, well we can all hope for miracles, right?

IMG_3446

IMG_3462

To start off the new blogging year, I wanted to share with you one of my favorite and easiest dessert recipes EVER, Zuccotto. It’s an Italian delight composed of pound cake, liquor, whipped cream, and a smattering of chocolate and toasted almonds. I mean, how do you say no to that?!? One of the things that I love about this dessert, outside of the fact that it’s utterly delicious and amazing, is that it’s super easy AND, dare I say it, YOU don’t have to bake a thing! Yes, I’m saying that you can pull this off with store purchased pound cake and no one will be the wiser or judge you for it. Why? Because ladies and gents, while I’ll be the first to roll up my sleeves and get elbow deep into the cake flour, there are times (many in fact) where we just don’t have the time nor the energy to get down and floury! Any pre-made pound cake will do, however, I have personally found that the frozen Sara Lee ones work the best for me.

IMG_3422IMG_3425

You should make this a day in advance to let the flavors meld together and allow for the cake to soak up some of the liquor. Oh yes, I did mention there was liquor in this right? 🙂 Once set, the end result is a cake that looks sophisticated, tastes amazing, and is sooo easy to make.

IMG_3430

IMG_3436

IMG_3438

IMG_3441

Zuccotto
Adapted from various cookbooks, recipes all over the place

Ingredients

2 – 12 ounce pound cakes, I prefer the frozen Sara Lee ones, thawed
1/4 cup to 1/3 cup brandy or amaretto (we usually use amaretto)
6 ounces bittersweet chocolate
3 cups chilled whipping cream
1/2 teaspoon almond extract
1/2 teaspoon vanilla extract
1/3 cup powdered sugar
1/2 cup sliced almonds, toasted
Cocoa powder for dusting

Large glass bowl, 1 1/2 quart size

Preparation

Spray your bowl with non stick cooking spray and then, using 2 sheets of plastic wrap, line the inside of the bowl completely. Cut the pound cake into 1/2 inch slices and then cut each slice diagonally to form triangles. Arrange cake triangles inside your bowl to form a starburst pattern in the center and then line the sides with remaining slices. Try to keep the slices as close together as possible and feel free to fill in any “gaps” with additional pieces of cake cut to size. Reserve the extra triangles or squares. Once finished, brush all the cake slices with brandy or amaretto.

In a separate metal or glass bowl set over a pot of simmering water, melt your chocolate, stirring until it is nice and smooth. Set aside and allow to cool slightly while you prepare the whipped cream. Using an electric mixer, beat 3 cups of whipping cream on high and slowly add in your powdered sugar until thick and fluffy. Gently fold half of the whipped cream into the chocolate bowl until combined. Spread chocolate whipped cream mixture and cover the pound cake in the prepared cake bowl, creating a well in the middle.

Add toasted almonds, almond extract and vanilla extract to the remaining whipped cream mixture and fold gently until combined. Spread into the well in the center of the chocolate filling. Top with remaining cake slices, brushed brandy or amaretto side down, to completely cover the filling of the cake, trimming the cake slices to fit, if necessary. Cover the cake with plastic wrap and refrigerate at least for 1 day.

To serve, invert cake onto a platter, unmold and remove plastic wrap. Sift cocoa powder on top right before serving.

Heart Crusted Peach and Cardamom Pie

•July 30, 2012 • 3 Comments

I love pie. Don’t get me wrong…I’m always a sucker for the next new tiramisu or cheesecake that graces the menu, but in my heart of hearts, I will always love me a good ol’ fashioned slice of pie. Golden, flakey, fruit filled little packages of heaven. Seriously, have you ever met a slice of pie that you didn’t find charming?

With the summer bounty in full swing and me having an unending supply of Jersey peaches *swoon*, I find myself thinking of nothing but peach pies. Granted, there’s something utterly magical about biting into a ripe, juicy Jersey peach that almost instantly transports me back to my childhood when my parents would take me fruit picking, but I wanted to make some new memories as an adult with my bounty of peaches! A pie worthy of my 35 years of concocting in the kitchen!

So let’s talk pie fillings. This is where we can get super creative, right? Everybody always looks to the crust as the first indicator of a great pie, but let’s face it, it’s the amazing filling inside that really makes your heart sing! A great crust will never be enough to save a lackluster filling which is why I totally fell in love with this recipe. ost fruit pie fillings consist of fruit, sugar, cornstarch, and maybe some juice. This recipe calls for addition of cardamom which, I’m telling you, if you’ve never added to fruit pies, you’re missing out! Cardamom adds that extra ooomph of flavor and lifts this peach pie up to the next level. So for you flavor savors out there, this pie is for you!

I changed the recipe of this pie from a single crust to a double one because, well, golden, flakey crust. Hellooo? Plus, call it my OCD, but I like having my pie slice “contained” if you will with 2 beautiful crusts. The top crust does take a bit of effort to roll, cut, and re-roll, but the end result is a pie that is so delectably cute, your heart will absolutely melt. I know I sure did.

Heart Crusted Peach and Cardamom Pie

Adapted from Bon Appétit | August 2009

Ingredients

Crust:
2 1/2 cups unbleached all purpose flour
3 teaspoons sugar
1/2 teaspoon salt
1 cup (2 sticks) well chilled unsalted butter, cut into 1/2-inch cubes
6 tablespoons (or more) ice water
2 1/2 – 3″ heart or scallop shaped cookie cutter

Filling:
2 1/2 pounds firm but ripe peaches, peeled, halved, pitted, sliced 1/2 inch thick
1/3 cup sugar
3 tablespoons cornstarch
2 teaspoons fresh lemon juice
1/4 teaspoon ground cardamom
1 egg, beaten to blend (for glaze)
1 1/2 tablespoons raw sugar*

Preparation

For crust, blend flour, sugar and salt in processor until well mixed. Add in butter, pulsing mixture until it resembles very coarse meal. Add in 6 tablespoons of water and continue pulsing until moist clumps form. Add in additional water by the teaspoonful if dough is too dry. Turn out dough onto lightly floured surface and knead gently until dough comes together, approximately 4 to 5 turns. Divide in half. Flatten each half into a disk and wrap tightly in plastic wrap. Chill at least 1 hour or up to 1 day.

Roll out 1 disk onto lightly floured work surface into an 11 inch round. Place and center into a 9″ diameter glass pie dish. Set aside and chill in fridge. Roll out second disk into 13 inch round and using shaped cookie cutter, cut shapes from dough. If necessary, remove dough scraps, reroll, and cut out additional shapes for a total of about 25 shapes. Set aside and chill on sheet in fridge while preparing filling.

Position rack in center of oven and preheat to 400 degrees. Place peaches in medium bowl and add sugar, cornstarch, lemon juice and cardamom. Toss to coat. Transfer peach filling to prepared pie dish. Carefully arrange dough cutouts on top of filling in concentric circles, slightly overlapping. Cover pie completely. Brush crust with beaten egg, then sprinkle with raw sugar.

Place pie on rimmed baking sheet. Bake until crust is golden brown, peaches are tender, and juices are bubbling thickly at edges, about 40-45 minutes. Transfer pie to rack and cool at least 30 minutes.

* Also called turbinado or demerara sugar; available at most supermarkets and at natural foods stores.

Lamingtons…the Aussie treat that I never knew even existed!

•February 22, 2012 • Leave a Comment

I learned a few months ago that all of this time, I’d been missing out on a fairly easy, yet deliciously delightful little treat called Lamingtons. Square pieces of sponge or pound caked enrobed in chocolate and sprinkled with dessicated coconut. I heard about this and instantly thought, “Whoa! Must. Have. Now!” Yeah…seriously, where have these been all of my life and why is it I waited till I was 34 to learn about these? I owe it all thanks to my fellow cubicle warrior Vince’s good client, Tim, an Aussie transplant who continues to enrich our lives with beer and food knowledge on a regular basis. He’s almost like me…only I have better hair and don’t have a weird accent 😉

But I digress…back to the lamingtons! As I said before, lamingtons consist of 3 core ingredients: sponge cake, chocolate, and dessicated coconut. From what I’ve learned, these are a fairly common staple and almost every Aussie household has their own variation on how they prepare it. I was able to find a recipe that seemed within my skill set and time frame to accomplish and set to work. While this may not be the lamington recipe that some of you have had before, it should be fairly close and equally delectable!

Not to be confused with the flaky, sweetened coconut that we have here in the states..dessicated coconut is just what it sounds like…dry coconut. Since I wasn’t able to find any here, I went with what I had, the flaky, sweetened stuff and Tim said it wasn’t bad at all. Now I don’t know about you, but I was pleased as punch with his stamp of approval. Yes, it’s true…I am pretty easy to please!

Lamingtons
Adapted from Joy of Baking and
www.allrecipes.com

Ingredients

For sponge cake:
2 cups all-purpose flour
2 teaspoons baking powder
1/4 teaspoon salt
1/2 cup unsalted butter, at room temperature
3/4 cup granulated white sugar
2 large eggs
1 teaspoon pure vanilla extract
1/2 cup milk

For chocolate icing:
4 cups (1lb) confectioners’ sugar
1/3 cup unsweetened cocoa powder
3 tablespoons butter
1/2 cup milk

2 (8 ounce) packages flaked coconut (use desiccated coconut)

Preparation

Preheat oven to 350 degrees F and center rack in oven. Prepare 8×8 cake pan with baking spray or butter.

In a large bowl, sift flour, baking powder and salt. Set aside.

Using an electric mixer, cream butter and sugar together until light and fluffy, about 3 minutes. Add eggs, one at a time, beating well after each addition until incorporated and scraping down sides of bowl. Add in vanilla extra and beat until well combined. With mixer on low speed, add in flour mixture and milk, in 3 additions, alternating, beginning and ending with flour. Beat until flour mixture is *just* incorporated. Do not overbeat.

Pour batter into prepared pan and smooth top with knife or offset spatula. Bake for 25-30 minutes, until toothpick inserted in center comes out clean. Remove from oven and allow to cool in pan on for 10 minutes before turning cake out onto a wire rack and cooling completely overnight. Make sure cake is completely cooled before preparing icing…cake will need to firm up to be handled.

When cake is completely cooled, cut cake into 16 squares and set aside while you prepare the icing. In a large bowl, whisk together confectioner’s sugar and cocoa. In a small heat proof bowl set atop a saucepan of simmering water (I call this the quickie double boiler), heat butter and milk until butter is melted. Whisk in cocoa mixture and continue to stir until mixture becomes smooth.

Now to assemble. Set a wire rack over a pan to catch any drips and arrange your cake pieces onto the rack. Place coconut in a very shallow bowl and set aside. Using a small spoon or ladle, drizzle/pour icing over each cake square until covered. You’ll have to roll each cake over to get the bottoms too. Lift cake out of icing and then roll it in coconut until covered on all sides. Place on prepared wire rack and allow it to set. Again, it’s critical that you’ve allowed the cakes to firm up overnight otherwise, they will completely fall apart during this step. Continue this for each piece until all of your lamingtons are done! Once they’ve set, they may be stored in airtight containers for up to a week.

Spicy and Cheesy Brussels Sprouts…The gateway sprout recipe!

•January 16, 2012 • 1 Comment

I think we’ve established that I like bitter foods. Be it bitter melon, some broccoli raab, or Brussels sprouts…if it makes your mouth tingle and do a snoopy dance, I’m there! As a kid, I think my mom may have served me Brussels sprouts once…one of those Bird’s Eye “nuke it in this package and GO!” sort of things and, as expected, it was bitter, terrible, and almost scared me off of Brussels sprouts forever…almost.

I’ve since had and successfully made Brussels sprouts many different ways as an adult and happily munch on it whenever I get a chance, but I have never yet quite been able to sell this particular veggie off to Alex until I came across this one. To this day, I kind of find it a little sad that my other half doesn’t quite enjoy bitter foods as much as I do…mind you, he can drink the hoppiest beers (you know, the kind that could hair on your chest) without any problems, but give him some sprouts or raab and he’s OUT! So I’m constantly trying to find ways to present these foods that is palatable to him…and luckily, I found one for sprouts!

Hhmm, this recipe is both spicy and cheesy? Surely this could work right? Oh, and it does. The cheese here tones down some of the bitterness of the sprouts while the red pepper flakes gives your taste buds something else to think about! The addition of nutmeg and cinnamon add a little extra brightness to the dish and are an unusual and welcome addition. The brussels are boiled to just about done though so they’re still crunchy and have a bit of a bite them too, reminding you that it is, after all, a crisp cabbage like veggie which should never be served soggy. As the original recipe extols…this is the recipe for even those who are staunch sprout haters. This is what I like to think of as the gateway sprout recipe. 🙂 Let the bitter food rage begin!

Spicy and Cheese Brussels Sprouts
Adapted from Epicurious | April 2010

Ingredients

1 pound Brussels sprouts
1 teaspoon salt
2 tablespoons extra virgin olive oil
1 teaspoon hot red pepper flakes, or to taste
7 cloves garlic, finely minced
1/2 teaspoon nutmeg, or to taste, preferably freshly grated
Dash of cinnamon
1/2 cup freshly grated Parmesan cheese

Preparation

Wash sprouts thorough and trim off ends, discarding any discolored outer leaves. If sprouts are large, cut in half or quarters into manageable, bite sized pieces.

Bring 2 quarts of salted water to boil and add sprouts. Boil, uncovered, about 4-5 minutes. Drain well. Sprouts will be a vibrant green color and will just give a bit when prodded with a fork. You want them crunchy tender, don’t overcook!

Wipe and dry pot, heat olive oil over medium high heat. Add in red pepper flakes and garlie and saute for 1 minute, until fragrant. Add sprouts, nutmeg, and cinnamon and saute for an additional minute. Mix in parmesan cheese and toss with sprouts until melted. Remove from heat, serve, and watch love of Brussels sprouts begin!

Lattice Topped Strawberry Rhubarb Pie

•January 14, 2012 • 2 Comments

I can’t believe that it’s been months since I last did a blog post! No, the unthinkable hasn’t happened and I haven’t stopped cooking…egads, just the thought of such a sad and terrible thing makes me feel weird in my stomach! No, I’ve actually still continued to cook and take pictures, but I never got around to the posting part. I blame Alex, you see, because he went and did something utterly amazing and wonderful! He proposed! He came to realize that he just simply couldn’t live without all those dishes of jambalaya, spaetzle, and udon! 😉 So while I’m still cooking and whipping things up, I’ve learned that nothing puts the brakes on blogging like preparing for a DIY wedding! Which, on a side, makes me wonder if I shouldn’t start blogging about some of our wedding projects? hmmm…

At any rate, I decided to finally put down the glue gun, floral tape, and embossing powder to sit down and tell you guys about this particularly fabulous pie that I made over the summer. Rhubarb was always one of those strange ingredients that I always remember people talking about and that I’d see in the supermarket, but that I never really knew what it was or how to cook it. I mean, people put this stuff in pies and make all kinds of sweet delicious sounding things out of it, but it all it looked like to me was a boring, nondescript reddish stalk. That’s not fruity or sweet right? Right! When I was in my 20’s, one of my friend’s mom finally sat me down and had me make rhubarb pies with her and showed me the true path to rhubarb heaven. Sour and tangy with just enough power to make your lips pucker and tongue start to salivate, rhubarb is a great backdrop to other sweet fruity flavors, lending a complex sweet/sour twist and guaranteeing a never too cloyingly sweet dessert. Now that’s my kind of dessert!

One of the more common pairings you’ll see with rhubarb is strawberry, either in a fruit bar or pies or whatever your creative heart decides to whip up. I decided to try my hand at a strawberry-rhubarb pie and kicked it up a notch with a lattice top. This was my first foray in a few areas…rhubarb pie, lattice pie tops, and a pie crust utilizing BOTH butter and vegetable shortening. Usually, I’m an all butter kind of gal, but this recipe sounded pretty interesting so I gave it a go. I’m so glad that I did. This pie crust came together in a snap, browned up beautifully, and smelled D-I-V-I-N-E. So good that even before the pie was done, Alex came into the kitchen asking what was cooking, when it was going to be done, and when he could “quality control test it”

Preparing rhubarb is relatively easy, just make sure you peel the outer “skin” off of each stalk and then cut/trim to required lengths. As far as preparation goes, this is one of the easiest! The rest of the pie comes together very quickly, nothing more than mixing all of the ingredients together and adding to the pie crust. Once baked and cooled, we dug in, and it was every bit as delicious as I had hoped it would be…sweet with a bit of tang that was refreshing and unique.

Lattice Topped Strawberry Rhubarb Pie
Adapted from Bon Appétit | April 1997

Serves 8

Ingredients

For crust

3 cups all purpose flour
2 1/2 teaspoons sugar
3/4 teaspoon salt
2/3 cup chilled butter flavored solid vegetable shortening, cut into pieces
1/2 cup plus 2 tablespoons (1 1/4 sticks) chilled unsalted butter, cut into pieces
10 tablespoons (about) ice water

For filling
3 1/2 cups 1/2-inch-thick slices trimmed rhubarb (about 1 1/2 pounds untrimmed)
1 16-ounce container strawberries, hulled, halved
1/2 cup (packed) golden brown sugar
1/2 cup sugar
1/4 cup cornstarch
1 teaspoon ground cinnamon
1/4 teaspoon salt

1 large egg yolk beaten to blend with 1 teaspoon water (for glaze)

Preparation

In a large bowl, combine sugar, flour and salt. Using a fork or pastry blender, cut in butter and shortening until a coarse meal forms. Add in and blend 2 tablespoons of ice water at a time until moist clumps form. Gather up all of the bits and pieces of dough into a ball and cut in half. Flatten each half into a dish and wrap separately in plastic. Refrigerate for about 1 hour, or until firm. Can be made up to 1 day ahead and kept chilled in fridge until ready to use. Let dough soften slightly to room temperature before rolling.

Preheat oven to 400 degrees. Combine all 7 ingredients for filling in a large bowl and toss gently to blend.

On a floured work surface, roll out 1 disk of dough to 13″ round. Transfer to a 9 or 9.5″ glass pie dish, leaving 3/4″ overhand and trimming any excess.

Roll out 2nd dough disk on lightly floured surface to 13″ round. Cut into qty 14 1/2″ wide strips. Spoon filling into the crust…there will be juices that have formed, do not pour into the crust. Arrange 7 dough strips atop filling, spacing evenly. Form lattice by placing remaining strips perpendicular to previous strips, weaving if you wish. Trim ends of dough even to overhang of bottom crust. Fold strips ends and overhand under and press to seal. Crimp edges.

Transfer prepared pie dish to a baking sheet. Brush glaze over crust and bake for 20 minutes. Reduce oven temp to 350 degrees and continue baking until pie is golden and filling thickens, about another 1 hour and 25 minutes. Prepare to have your house smell like butter heaven. Transfer pie to rack and cool completely before serving.

Keshi Yena

•September 12, 2011 • 1 Comment

Aruba…When you hear its name, you can’t help but envision white sand beaches, blue waters, sun, and a feeling of relaxation and happiness. Truly, it’s one of my favorite places in this entire world! I’ve been fortunate enough to have vacationed here twice so far and am looking forward to coming here again and again in the future. Not only is it truly “The Happy Island” if not the happiest island I’ve ever been to!

I love Aruba for so many reasons…the warm sunny beaches, the water that’s so clear and blue you’d swear that part of the sky just liquified itself here, and its food. Aruba has its fair share of tourist type fare, but if you look hard enough, you’ll find a few places that serve traditional Aruban fare that is both amazing and unique to the island. Now Alex and I, being of the nerdy touristy types, of course pored over our guide book from cover to cover (ok, maybe we didn’t, but when I say “we” it makes me feel less nerdy) and read up on a dish called keshi yena.

Aruba, being an island colony of the Netherlands, and being of mostly desert like terrain, has almost all of its food goods shipped in from overseas. Back in the old days, in order to make their food rations last longer, Dutch colonists would reuse the rinds of their cheeses, in this case namely good, amazing Dutch gouda, and stuff it with what they had on hand. What you get today is a dish that’s basically lightly encased in melted gouda cheese around a filling of shredded chicken or pork, mixed with raisins, veggies, nuts, and a little bit of heaven.

As soon as I read about this, I HAD to have it. Alex and I went to 2 separate restaurants in Aruba and did our keshi yena research. What we’ve found is that each place has its own rendition of keshi yena that was an illustration of each restaurant’s respective culinary style…the common themes between both iterations of the dish were the gouda cheese (yay!) and the tomato based sauce. What this meant to me was that each keshi yena has its own personality and that this is a dish that is very easily modified to best convey your own personality and culinary style!

Once we returned home, I set to work creating my own version of keshi yena which I share with you below. It does take a little bit of time getting together the ingredients and, while it may seem like a lot, trust me, it is soooo worth it. The smells that began emanating from our oven as it was cooking were absolutely divine and they did not disappoint on its promise of being an amazing dish!

Keshi Yena
As envisioned by TastyDesu by way of Gasparito’s and Nos Cunucu

Ingredients

2 medium onions, finely diced
1 bulb of garlic, peeled and minced fine
1 red bell pepper, finely diced
1 green bell pepper, finely diced
2 tomatoes, peeled and diced
2 dill pickles, minced
1/2 cup golden raisins
12 olives (I used black salty Kalamata Greek olives)
1 1/4 cup cashews, roughly chopped
2-3 cups of cooked chicken, shredded***
3/4lb Dutch Gouda, sliced

3/4 cup ketchup
3/4 teaspoon Worcestershire sauce
1 tablespoon dried thyme
1/2 tablespoon curry powder
1/2 tablespoon paprika powder
1 teaspoon chipotle powder, optional

Nonstick cooking spray
Olive oil

***Liz note: For this time around, I seasoned about 1.5lbs of chicken tenderloins with salt, pepper, and garlic powder and then baked it in the oven at 400 degrees for about 10-13 minutes until the juices ran clear. I’ve also made this dish with just plain boiled chicken with equally good results. I personally prefer the roasted/grilled method, but only if time permits.

Preparation

Preheat oven to 350 degrees and prepare a 9×13 baking dish by spraying with nonstick cooking spray and then layer with 1/2 of the sliced gouda on the bottom.

In a large bowl or mixing cup, mix together ketchup, worcestershire sauce, thyme, curry, paprika, and chipotle, if using, until well combined. Set aside.

In a large pot, heat about 1 tablespoon of olive oil over medium high heat till it shimmers. Add in onions and fry until golden brown, about 7 minutes. Add in garlic and continue to fry for an additional minute. Add in both red and green bell peppers, tomatoes, pickles, olives, raisins, and cashews and mix well before adding in chicken. Stir in ketchup mixture to pot until well combined. By now, the kitchen will start to smell amazing!

Pour mixture into prepared baking pan lined with gouda. Smooth mixture and top with remaining gouda slices. Bake in oven for about 30 minutes or until cheese is melted and slightly golden at the edges.

Chunky Peanut, Chocolate, and Cinnamon Cookies

•August 29, 2011 • 3 Comments

I’m back! While I never actually stopped cooking, I admit, I did get sidetracked from posting with the siren call of summer and vacation! Back to the business though…and today’s business is COOKIES. Honestly, I could probably count on one hand the number of cookies that I’ve met that I didn’t like. Let’s face it, cookies are like the unsung language of love and friendship. I mean really, when was the last time you met a cookie that didn’t put a smile on your face?

These chunky peanut cookies put a smile on my face and those of my coworkers, without a doubt. I decided one day that I had a hankering for a peanut cookie, but not just a run of the mile, oh-heres-some-token-peanut-butter cookie, noooo, I want a REAL peanut cookie that had whole peanuts in it. And how, but Martha Stewart to my rescue?

These cookies are one of the few cookies that touts peanuts, the chunky, toothsome kind, and not peanut butter, as its main headliner. And it succeeds! These cookies came together in a snap when, at 7:30pm one night, the craving inspiration struck me and I began foraging around in my cupboard for ingredients. By bedtime, the house smelled divinely of peanutty goodness and I had a bounty of treats of my coworkers (and Alex’s!) to enjoy!

Chunky Peanut, Chocolate, and Cinnamon Cookies
Adapted from Martha Stewart

Yields about 5 dozen

Ingredients

2 cups all-purpose flour
1 teaspoon baking soda
1 teaspoon salt
1/2 teaspoon ground cinnamon
3/4 cup (1 1/2 sticks) unsalted butter, softened
1/2 cup smooth peanut butter
1 cup packed light-brown sugar
1/2 cup granulated sugar
2 large eggs
1 1/2 cups semisweet chocolate chips
2/3 cup roasted, salted peanuts, coarsely chopped**
2 teaspoons pure vanilla extract

Preparation

Arrange racks to middle of oven and preheat to 350 degrees. Line baking sheets with parchment paper. In a large bowl, whisk flour, baking soda, salt and cinnamon. Using an electric mixer, mix butters on medium until well combined, about 2 minutes. Mixture will look light brown. Add in sugars and continue mixing another 2 minutes. Add in eggs and mix, one at a time, until incorporated. Add in flour and mix until just combined. Using a wooden spoon, gently fold in chocolate chips, peanuts and vanilla until evenly distributed. Refrigerate dough 15-20 minutes, until it is slightly firm.

Scoop dough into 1″ balls and space 2-3 inches apart on prepared baking sheets. Using the palm of your hand, flatten each ball slightly and bake until just golden, 11-13 minutes. Transfer cookies to wire racks to cool.

Once thoroughly cooled, cookies will keep in airtight container, about 1 week…if they can last that long!

**Liz’s Note: Make sure to read the labels of the peanuts you’re buying unless you’re buying whole, unshelled. My local supermarket had several different choices of “roasted peanuts” to choose from and I learned a while ago that not all roasted peanuts are created equal. Most manufacturers are wont to add some seasonings and coloring preservatives.

Fruit Tart with Custard and Berries

•June 21, 2011 • 3 Comments

One of my favorite things in the world are fruit tarts. Something about the glistening plethora of berries and fruits nestled in a flaky crust just makes my heart sing. I remember having some form of fruit tarts that my parents would pick up from the asian bakery when I was a kid, but I don’t think I really came to truly appreciate fruit tarts until I was in my late 20’s.

I had decided to take a solo trip up to Boston to take in some culture, sights, and some me-time. In my travels, I wondered into Quincy Market and there, in one of the bakery shops, sat a display of small fruit tartlets. Glistening under the incandescent lights of the market, the lightly glazed berries and slice of kiwi looked like little jewels beckoning me to take them home.

The best fruit tarts, in my opinion, combine a flaky, tender crust that is slightly sweet and buttery. I actually prefer a shortbread like crust, but every time I’ve attempted to use a shortbread, my resulting crust is so dense that you end up using the side of your fork to hew through the crust…not exactly the “tender” crust I was looking for. In the end, a basic pate sucree is the perfect crust to do the job.

The elements of a great fruit tart though isn’t just a crust and fruit…oh noooo. There’s also the filling…not just any cheesy run of the mill fruit filling or something. No, in this case, the ideal filling is a luxurious vanilla custard that provides the perfect backdrop for the fruit…like a creme brulee without the fun of the blowtorched sugar part.

Just to up it one extra notch, I also discovered that “painting” the crust with a thin layer of dark chocolate serves as a nice way to “waterproof” the crust and keeps it flaky longer. Besides, isn’t everything just a bit better with some dark chocolate? I certainly think so!

Fruit Tart with Custard and Berries
Adapted loosely from Joy of Baking

Ingredients

For Pate Sucree:
1 1/4 cups all-purpose flour, plus more for dusting
2 tablespoons granulated sugar
1/8 teaspoon salt
1/2 cup cold (1 stick) unsalted butter, cut into pieces
1 large egg yolk, lightly beaten
2 tablespoons ice water, plus more if needed

For Pastry Cream:
1 1/4 cups whole milk
1 vanilla bean, split lengthwise
3 large egg yolks
1/4 cup sugar
2 tablespoons all-purpose flour
2 tablespoons cornstarch
1 Grand Marnier orange liquer

3 cups assorted berries and fruit
4 ounces of your favorite chocolate (I prefer dark)

For glaze:
1/4 cup apple jelly
1-2 tablespoons water

Preparation

To make the pate sucree, pulse flour, sugar, and salt in a food processor to combine. Add butter and process until mixture resembles coarse meal, about 10 seconds. Add egg yolk, and pulse. With machine running, add ice water in a slow, steady stream through feed tube until dough just holds together. Turn out dough onto a work surface; shape into a disk. Wrap in plastic, and refrigerate at least 1 hour (up to 2 days).

Preheat oven to 400 degrees with rack in center position. Lightly spray or butter and flour a 9″ tart pan with a removable bottom. Evenly pat the chilled pastry onto the prepared pan, covering the bottoms and sides of the pan. Cover with plastic wrap and place in freezer for 15 minutes. Bake chilled crust for 5 minutes and then reduce oven temperature to 350 degrees. Continue to bake for another 15 minutes or until crust is dry and golden colored. Remove and cool completely on wire rack. Crust may be made 2 days ahead of time, just store in air tight container at room temperature.

In small bowl, whisk flour and cornstarch together. In a separate, heatproof large bowl, mix sugar and egg yolks together and then add in flour mixture. Mix until a smooth paste forms.

In a separate saucepan, bring milk and vanilla bean just to boiling…be careful not to scald the milk. Remove from heat immediately and slowly drizzle into egg mixture, whisking constantly to prevent curdling. If you do get some curdled egg pieces, just sieve the mixture afterwards. Remove vanilla bean and scrape out seeds and add seeds to egg mixture. Pour egg mixture into a medium saucepan and cook over medium heat until boils, whisking constantly the whole time. When mixture comes to boil, continue whisking for another minute or until mixture becomes thick. Remove from heat and immediately whisk in Grand Marnier. Pour into a clean bowl and cover immediately cover surface with plastic wrap (this prevents a “skin” from forming) and cool to room temperature.

Melt chocolate either in a double boiler or in a heatproof bowl in the microwave, heating at 30 second intervals on half power, stirring each time until fully melted. Using a pastry brush, paint the inside of the tart crust thoroughly until all chocolate is used up. Be sure to coat the bottom and the sides. Let chocolate harden, about 10-15 minutes before assembling tart.

To assemble tart, remove crust from tart pan and place onto your serving platter. Gently spread pastry cream onto the bottom of the tart shell using an offset spatula. Assemble fruit on top of cream…let your creativity be your guide here. I’ve found that randomly placed fruit is just as lovely as fruit arranged in concentric circles. If doing concentric circles, it’s best to start from the outside edge and work your way in, using overlapping circles. Once fruit has been arranged, prepare glaze by warming jelly with water in the microwave for 20 seconds until jelly has melted. Stir. Use a pastry brush and gently brush a light coat of glaze on the fruit. Serve

If not serving immediately, refrigerate in an airtight container and bring back to room temperature before serving. This is best eaten the day it is assembled.

Williamstown, Wedding, and Baked Pears, oh my!

•June 8, 2011 • Leave a Comment

This has been the spring of weddings! In the span of 3 weeks, we’ve attended 2 weddings of very close friends…the first of which was held in Williamstown, MA amidst the beautiful Berkshires. I always love going up here to visit…nothing quite beats the beautiful vistas up here which are breathtaking and remind me that no matter how busy our lives can be, there should always be time to appreciate nature and the world around us.

One of the places that we always find ourselves paying homage to whenever we’re in the area is a great pub called The Olde Forge in Pittsfield. The home of a formidable array of beers both on tap and bottled, one of the highlights of the Forge is the wings. I’ve always had their regular ones, but had recently heard of a their own twist called Buff Orpington wings…wings deep fried to crisp perfection and then tossed in a sauce with a tinge of curry and orange peel. Not your conventional wings, yes, but these quickly jumped up my list as one of the best wings I’ve ever had. They’re that good!

For Zach and Bethany’s wedding, we were fortunate enough to stay at a little jewel of a bed and breakfast on the edge of Williamstown and Vermont called The Birches at Steep Acres Farm. Not only was it situated on 50 acres worth of farm complete with tons of hiking trails and places to mountain bike, but it had some of the best breakfasts that I’ve ever had in my life. Seriously. The. Best. Breakfasts. Ever.

The first morning we had these baked pears stuffed with granola and then topped with vanilla yogurt and then topped with some additional granola. Honestly, I think this very well may be what heaven would feel like on a plate. It’s one of the very few times that I immediately upon return home, I sought to figure out how to make this myself. Ok, maybe this sort of zeal isn’t that rare, but you get the drift at just how amazing I thought this was.

What I learned after trying this out myself at home was that this is probably one of the best, easiest, and dare I say, healthiest? breakfasts that I’ve ever made. Pears, yogurt, and granola. That’s literally all you need. The best part is that even though it’s so easy to prepare, the results to so utterly delicious that no matter who you make this for, they’ll think that you’re the culinary rock star of the year! I don’t know about you, but I could get used to being called that!

Baked Pears with Vanilla and Granola
As envisioned by TastyDesu and inspired by The Birches B&B

Ingredients

2 medium sized pears, preferably firm ones (I used Taylor’s Gold variety)
1/4 cup or so of your favorite granola (I used a bag of Trader Joe’s Pecan and Praline granola)
1 cup of vanilla yogurt
Cooking spray

Preparation

Preheat oven to 375 degrees. Using a sharp knife, cut off about 1 inch from the top of each pear, then use the knife and carefully core the pear. Prepare a heat proof dish and spritz it evenly with cooking spray. Place pears in dish, original cut side up, and spritz lightly with more cooking spray. Cook 13-15 minutes, until pears are warmed through and slightly softened. Remove from oven and move onto serving plate. Stuff granola into each pear, top with vanilla, and garnish with additional granola. Serve while still warm.